Bed Bugs in Vacuum Cleaner: Quick Troubleshooting
Urgent troubleshooting guide to detect, remove, and prevent bed bugs in your vacuum cleaner. Learn safe inspection steps, cleaning methods, and prevention strategies for households.

Bed bugs in vacuum cleaner are not typical, and they usually hitchhike in from an infested area, hiding in bags, hoses, or crevices. The quickest fix is to stop using the unit, seal the bag or canister, and inspect every attachment. Wipe and disinfect any surfaces, then either replace the bag or wash the canister thoroughly. According to Vacuum Cleaner Guide, act fast.
Understanding bed bugs in vacuum cleaner
Bed bugs in vacuum cleaner are not a defect in the appliance; they are hitchhikers that find shelter in the parts you rely on during cleaning. When you haul a bed bug–infested mattress, couch, or baseboard past the living area, a few insects can cling to the nozzle, slip into hoses, or nest inside a bag or canister. The result is a frightening surprise that can spread pests to other rooms if not handled correctly. The goal is rapid containment and a thorough cleaning of all components—bags, filters, hoses, and the inner walls of the unit—so that hitchhikers do not escape back into your home. Signs of trouble include tiny dark spots on filters, shed skins, or occasional live bugs that appear during or after cleaning. Do not smash bugs inside the machine, which can spread fragments and give survivors new hiding spaces. Instead, seal any found debris in a bag, wipe down parts with a mild disinfectant safe for plastics, and plan a systematic follow-up cleaning. According to Vacuum Cleaner Guide, swift containment and clean reassembly are crucial to preventing reinfestation.
How bed bugs reach your vacuum cleaner
Bed bugs move by hitching rides on people, pets, and items that come into contact with infested surfaces. During vacuuming, especially across mattresses, upholstery, or baseboards, bed bugs can be drawn into the canister or bag under suction. They may also hide inside attachments, hoses, crevices, or brush heads where fabric fibers create micro-habitats that protect them from being sucked out. If the vacuum is used across multiple rooms or on various infested items, bed bugs can hitchhike and spread. Based on Vacuum Cleaner Guide analysis, the most common routes are worn or compromised bags, clogged or outdated filters, and gaps around the nozzle that allow pests to travel in and out. Even sealed bags can harbor nymphs or eggs if disposal is delayed. The best approach is to minimize opportunities for transfer by maintaining containment and performing a careful cleaning pass through every part of the machine, including the exterior.
Immediate steps to take if you suspect infestation
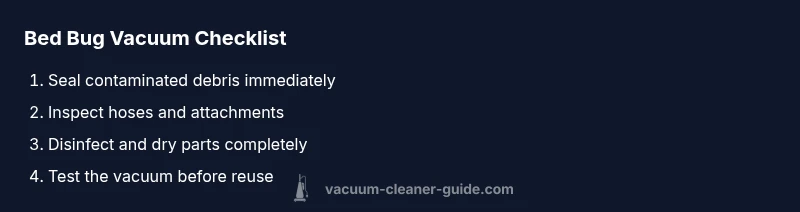
If you suspect bed bugs have entered your vacuum cleaner, begin with containment and a careful inspection. 1) Power off, unplug, and remove the bag or empty the canister outside, sealing the bag in a second plastic bag. 2) Wipe interior surfaces with a damp cloth and a mild disinfectant, avoiding harsh chemicals that could damage plastic parts. 3) Inspect hoses and attachments with a flashlight; detach and brush out any debris, then run the hose-cleaning attachment to dislodge trapped pests. 4) Replace the bag or dry the canister completely before reuse, and store the bag in a sealed container away from living spaces. If you prefer, use a washable fabric bag and launder it after use. A full overhaul may be required if signs persist after cleaning, and consider calling a pest professional if you live in an apartment or multi-unit building.
Thorough cleaning and disinfection plan
Disassemble the unit according to the manufacturer’s guidance and avoid forcing components. Clean every part with hot water and a mild cleaner, then allow all parts to dry completely before reassembly. For metal or hard-plastic components, a brief steam pass can kill eggs or nymphs where the appliance specification allows it; use steam only if the parts are rated for it. Use compressed air to blow dust from tight corners and crevices. Sanitize the interior and exterior surfaces of the canister, hoses, and attachments; do not allow moisture to reach the motor. After reassembly, test on a non-living surface to confirm proper function. If you observed live bed bugs or recurring signs, contact a pest-control professional and discuss integrated pest management for your home, especially in multi-unit buildings. The thorough cleaning helps prevent reinfestation and protects household members with sensitive allergies or pets.
Prevention and ongoing maintenance
Prevention begins with a disciplined cleaning routine and careful handling of infested items. Keep vacuums in a sealed area away from sleeping spaces and use bags that can be sealed or washable fabrics that are laundered after each use. Encase mattresses and upholstered furniture with bed bug–proof covers and inspect items before bringing them into the home. After every cleaning, empty bags and clean attachments promptly, then store the machine in a sealed container or closet to limit access by pests. Regularly inspect the vacuum for new signs of pests and perform a quick post-clean check in high-risk rooms (beds, couches, and baseboards). If signs recur in weeks after the initial cleaning, re-evaluate the cleaning plan and consider a professional inspection for comprehensive remediation. The Vacuum Cleaner Guide team emphasizes proactive maintenance and early intervention to prevent reinfestation and protect household health.
Steps
Estimated time: 60-90 minutes
- 1
Power down and secure the unit
Unplug the vacuum and remove the bag or empty the canister into a sealed bag. Wear gloves to protect your hands from any pests. Keep the bag isolated from living areas during disposal.
Tip: Do not carry a bag through common living spaces. - 2
Seal and dispose of contaminated debris
Place the bag or emptied canister contents into a second plastic bag and seal it tightly before disposing in an outdoor trash bin. Do not leave contaminated bags inside your home.
Tip: Double-bag to prevent accidental leaks. - 3
Inspect hoses and attachments
Detach hoses and brush heads; use a flashlight to inspect seams and crevices. Brush out any material and run a cleaning attachment to dislodge trapped pests.
Tip: Pay attention to tight bends and brushes where bugs hide. - 4
Disinfect interior surfaces
Wipe the interior canister, hose interiors, and attachments with a damp cloth and a mild disinfectant. Rinse if necessary and ensure everything dries completely before reassembly.
Tip: Avoid harsh chemicals that could damage plastics. - 5
Replace or dry and reassemble
Insert a fresh bag or ensure the canister is dry before reassembling. Reattach hoses and heads, then perform a test run on a non-living surface.
Tip: Test function before returning to living spaces. - 6
Assess for reinfestation and seek help
If signs persist after cleaning, consider professional pest control services, especially in multi-room or multi-unit homes.
Tip: Document signs to share with professionals.
Diagnosis: Suspected bed bugs in vacuum cleaner after cleaning a bedroom or bed area
Possible Causes
- highInfested debris drawn into canister or bag
- mediumBed bugs hiding inside hoses/attachments
- lowImproper disposal or storage of contaminated debris
Fixes
- easyPower off and unplug; seal and remove bag or empty canister into sealed bag; replace bag or thoroughly clean canister
- mediumInspect and clean hoses/attachments; brush out crevices; disinfect after cleaning
- hardIf signs persist, contact a pest professional and review building-level sanitation
FAQ
Can bed bugs survive in a vacuum bag or canister?
Bed bugs can survive in small spaces for some time, including inside bags or canisters, especially if the environment remains suitable. Sealing and disposing quickly minimizes risk, and thorough cleaning afterward helps prevent survival elsewhere. If signs persist, seek professional help.
Bed bugs can survive in small spaces for some time, including bags or canisters. Seal and dispose quickly and clean thoroughly. If signs continue, contact a professional.
How can I tell if bed bugs are in my vacuum after cleaning?
Look for dark spots on filters, shed skins, or tiny live bugs in or around the nozzle, hoses, and bag. If you notice repeated signs after cleaning, repeat the containment steps and consider a professional inspection.
Look for dark spots, shed skins, or live insects in the nozzle, hoses, or bag. If signs persist after cleaning, repeat steps or call a professional.
Is it safe to reuse my vacuum after suspected bed bugs?
Yes, after a thorough cleaning, disinfection, and complete drying of all parts. If you are unsure about the infestation level, pause use and consult a pest-control professional.
Yes, after cleaning, disinfecting, and drying all parts. If unsure, pause use and consult a professional.
Should I replace the vacuum if infestation continues?
Replacement is not always necessary. A comprehensive cleaning and preventive measures can eliminate many infestations. If repeated signs appear despite thorough cleaning, evaluating a replacement or professional remediation is wise.
Replacement isn't always needed. If signs persist after cleaning, consider replacement or professional remediation.
How do I prevent bed bugs from entering the vacuum in the future?
Use sealed or washable bags, inspect items before vacuuming, and encase furniture and beds with bed bug–proof covers. After use, clean attachments and store the vacuum in a sealed space. Regular inspections reduce reinfestation risk.
Use sealed bags, inspect items before vacuuming, and store the vacuum in a sealed space. Regular checks help prevent reinfestation.
Watch Video
The Essentials
- Inspect vacuum parts for bed bug signs.
- Seal and discard contaminated debris promptly.
- Disinfect, dry thoroughly, and reassemble before reuse.
- Follow Vacuum Cleaner Guide's verdict: act quickly and follow the steps.
- Prevent reinfestation with routine maintenance and inspections.